How to use GitHub Desktop and XAMPP to review PRs

In previous GitHub Desktop tutorials we showed you how to submit a pull request (PR), so you could start contributing to the development of an open-source project such as ClassicPress. Once you are comfortable with this concept, the next stage in contributing is to start testing and reviewing other PRs that have been submitted. An easy way to do this is to set up a local version of Classicpress using a program such as XAMPP on your computer and link it to GitHub Desktop. This tutorial will take you through the required steps.
Set up the local server
There are plenty of online tutorials about using XAMPP (or any of the other web server stack packages) so this won’t be covered in much detail. You will first need to set up a database, but make sure it creates either a MySQL or MariaDB type. XAMPP uses phpMyAdmin so the simplest method is to make a user and select the options to also create a database with the same name, and apply the necessary permissions. Your setup screen will look something like this…
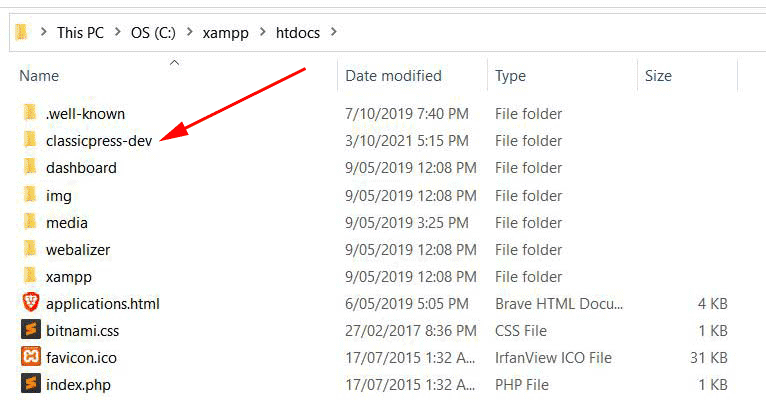
Once the database is created, go into the XAMPP directory and add a folder for the files; in this example we will create a folder called classicpress-dev in the htdocs folder.
Add the ClassicPress files
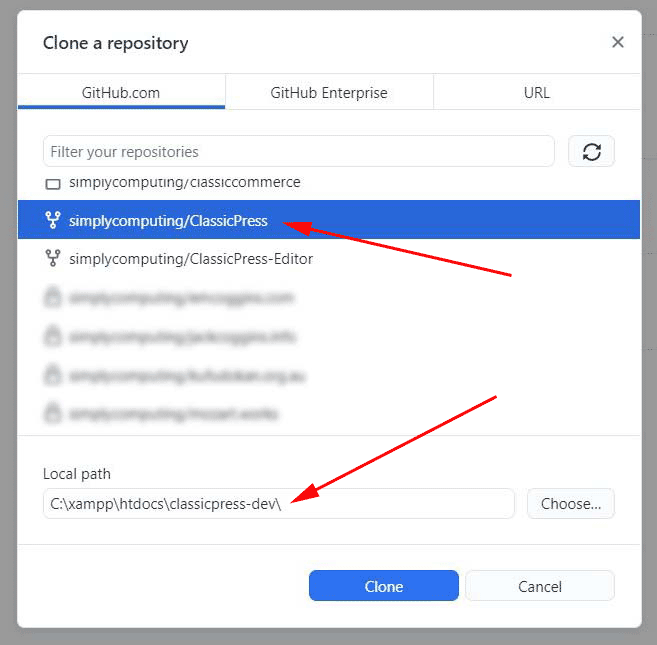
Now we add in the files for ClassicPress. Open GitHub Desktop and select ‘Clone repository’ from the ‘File’ menu.
Select your own fork of ClassicPress from the dropdown list, and make sure the local path is entered to the correct XAMPP directory, in this case C:\xampp\htdocs\classicpress-dev\.
Hit the ‘Clone’ button when you are ready. You might be shown one more message, but leave it as the default, hit ‘Continue’ and wait while the clone downloads.
Set up ClassicPress
If you now go to the classicpress-dev folder in XAMPP you should see a lot of files have been added. Note that the actual ClassicPress installation files are in the src folder.
Go to your browser and visit localhost/classicpress-dev/src. You should be able to complete the setup of ClassicPress in the usual way. Of course, you will need the database name, username and password that you entered when you created the database.
To login to your new site, use the address localhost/classicpress-dev/src/wp-login.php. You can start installing plugins and a theme, and upload items to the media library. It is a good idea to create a site for testing that you are familiar with, so you can see if anything looks different or doesn’t work properly.
Add a PR to your localhost version of ClassicPress
Now comes the neat part. To start testing PRs you only need to go into GitHub Desktop and first make sure that the current repository is set as the version you have in XAMPP. Then click on the ‘Current branch’ tab and switch over to see the ‘Pull requests’. You can select any one of these from the list, such as Revise login page link layout (PR #795).
You may get another warning message but stick with the default to leave any changes on develop, and select ‘Switch branch’.
Now when you login to your Classicpress-dev site you should have those PR files included. In this example the login screen will show the changes that were made in that PR.
Start testing and report any issues on GitHub
Now you can start reviewing. The PR on GitHub should have a step-by-step guide on how to test the change so work through this. Keep an eye out for anything that may be glitchy or stop working. Report any problems you find in the comments section of the GitHub PR, and don’t forget to also report if it does work for you with no issues. Positive feedback is a very important part of this process.
You can also ask for test steps to be provided or request any other relevant details that may help you. Or add in any steps you took to test it yourself, perhaps including before and after screenshots.
There are more details in the contribution guidelines about submitting and reviewing PRs, or ask on the ClassicPress forum if you need any more help.
To change to another PR just go back to GitHub Desktop and select another one from the list.


